vrijdag, april 26, 2024
  • lente.png
  • liefde.png
  • rozen.png
  • welkom.png

Demo Articles

Menu Setup

CSS Dropdown Menu

Grunge is outfitted for support for a CSS driven dropdown menu. Setup is simple, just follow the instructions below:-

  • Login into the Joomla administrator
  • Go to Extensions → Module Manager
  • Select the New button
  • Select Menu from the list
  • Set the Title to No; Set the Menu Name to mainmenu; Set Always show sub-menu items to yes
  • Select either header-bheader-f as the position

Effectively, all you need to do is assign a Menu Module to the Header-B position.

How to create Child / Sublevel menu items in Joomla

In order for menu dropdowns to appear, you need to setup parent and child menu items.

  • Login into the Joomla administrator
  • Go to Menu → Menu Name
  • Select a menu item that you wish to be in the dropdown
  • Locate the Parent Item form
  • Select the menu item that you wish for your item to appear under
  • Save

Perform the same task for all menu items that you wish to be child items.

Logo Editing

The following tutorial outlines how to edit the logo with Adobe® Fireworks CS4. Fireworks is required for logo editing. (CS3 can be used with our sources).

You will want to install the provided fonts before proceeding to edit in Fireworks, if you wish to use the same font for your logo editing.

Editing in Adobe® Fireworks CS4

Step 1

Open the logo-source.png file in Adobe® Fireworks.

logo

Focus on the right column, titled Layers. Select the Web layers directory and click the eye icon to the left of the logo slice (the green object). This will make the slice invisible so you can edit the file.

logo

Step 2

Double click on the logo text. Now you can edit the text of logo to your choosing.

logo

Step 3

Reactivate the Slice in the Web Layers column, this will place a green rectangle over the logo image. Change the size of the slice to match the new size if applicable.

logo

Step 4

Now you will want to export the logo. Right click on the image slice and select Exported Selected Slices... from the contextual menu. Proceed to export it to your computer for uploading.

logo

Step 5

If you are new to Fireworks, you may be wondering why it appears that there is only one style variation in the source. This is not the case as we take advantage of the Frame features of Fireworks. You need to simply switch frames to see all the other style variation sources.

There are a few ways to change frames and we will show 2 methods that you can use.

In the right column where you find the Layers toolbar including the Web Layers area, you should see another tab/toolbar named Frames. Just left click on the title Frames to enter the frames area. Then you can click on either of the frames which are named to show which style variant is on that particular frame.
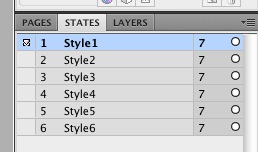
Logo

The second method is the most easiest and simplistic. At the bottom of the Fireworks canvas is a row of buttons, arrows just as previous and next. Select the arrows to switch between frames.
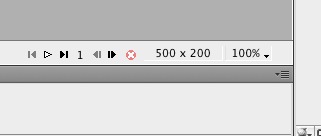
Logo

Uploading the changed files

Step 1

Once you have successfully edited then exported your new logo, you will need to upload it to your server. This process is best done via a FTP client such as Filezilla

  1. Open your FTP client on your local computer.
  2. Login to your web server where Grunge is installed.
  3. Navigate to the /templates/rt_grunge_j15/images/logo/*style*/ directory.
  4. Upload logo.png (and any other logo related images) to this directory (You may need to browse on the local panel in the FTP client to find where you have exported your logo).
  5. Clear your browser cache before viewing such as using the keyboard commands on Windows, Ctrl+F5.
Ensure that you are uploading the correct logo to avoid confusion if it does not change. Also take into account hosting permissions. Sometimes, hosts which are not designed for Joomla may have permissions not suited for the setup, thus, the upload will not be complete. In this case, contact your hosting provider.

Using Typography

Video Tutorial Currently Available! Launch the Joomla Using Typography Video Tutorial now!

Every RocketTheme template is accompanied by custom content styles known as Typography. This guide outlines how to use Typography in your content, as demoed on the Typography page.

In this guide, we will use the Attention Span Style, which uses the <div class="attention"><div class="typo-icon">...</div></div> syntax.

Content Editor

  • Login to the Joomla administrator
  • Go to Content → Article Manager; or, if you wish to use the syntax in custom modules, Go to Extensions → Module Manager
  • Choose the Article, or Custom Module
  • Click the HTML mode or equivalent in your editor
  • Insert <div class="attention"><div class="typo-icon"> ... some content ... </div></div>
  • Save
If you are using the TinyMCE editor, go to Extensions → Plugin Manager and select TinyMCE 2.0. Locate Code Clean-up on Save and select Never.

This prevents the stripping of HTML code from your content.

No Editor

  • Login to the Joomla administrator
  • Go to Content → Article Manager; or, if you wish to use the syntax in custom modules, Go to Extensions → Module Manager
  • Choose the Article, or Custom Module
  • Insert <div class="attention"><div class="typo-icon"> ... some content ... </div></div>
  • Save

Note, with the Content Editor (WYSIWYG) enabled, you need to enter HTML mode otherwise the typography will not work. If you are running no editor, this is not the case as you are interacting with the content at a code level.

Zoeken

Dag bezoeker!

Heeft u vragen over:
assortiment
evenementen
openingstijden?

Bel 
0418 - 51 35 80

Kijk voor nieuws, evenementen en actuele openingstijden op onze Facebookpagina.

Alles over rozen

Over rozen valt veel te vertellen. Hoe en wanneer u ze het best kunt planten, behandelen, bemesten, snoeien etc. Geregeld geven wij op Stadskwekerij Zaltbommel demonstraties en workshops! 

ga naar evenementen

Veelgestelde vragen

Heeft u een vraag? Het antwoord vindt u op deze pagina.

Ga naar de veelgestelde vragen